David Mertz, Ph.D.
Pooh-bah of pablum, Gnosis Software, Inc.
July 2000
Sometimes you want a full-blown GUI interface in your Python program. And other times a strictly command-line interface is the most appropriate usage. But still another class of Python programs would be well served by by having an interactive user-interface without the overhead or requirements of a graphical environment. For interactive text mode programs (under Linux/Unix), thencurseslibrary, and Python's standardcursesmodule as a wrapper for it, are just what you need for your program. This article discusses the use ofcursesin Python, and uses example source code in the form of a front-end to the Txt2Html program developed throughout this column.
Python is a freely available, very-high-level, interpreted language developed by Guido van Rossum. It combines a clear syntax with powerful (but optional) object-oriented semantics. Python is available for almost every computer platform you might find yourself working on, and has strong portability between platforms.
curses (usually ncurses in practice) is a library whose
routines give a programmer a terminal-independent method of
controlling character screens. curses is a standard part of
most Unix-like systems, including Linux; ports are available
for Windows and other systems as well. curses programs will
run on text-only systems, as well as within xterm's and other
windowed console sessions, which provides a very broad coverage
for these applications.
The interface features available in Python's standard curses
module are limited to the features available in essentially
every type of "glass teletype" (the archaism here indicates the
1970s origins of curses). There a number of ways to bring
greater sophistication to interactive text-mode programs
written in Python; and these fall into two categories. On the
one hand, Python modules exist to provide support for the
full-feature set of ncurses (which is a superset of curses)
or slang (which is a similar but independent console
library). Most notably, using one of these enhanced libraries
by way of an appropriate Python module wrapper, adds color
support to your application. On the other hand, a number of
high-level widget libraries exist that are built on top
curses (or ncurses / slang) that add features like buttons,
menus, scroll-bars, and various common interface devices.
Programmers who have worked with (or even just seen
applications developed in) libraries such as Borland's
TurboWindows (for DOS) will be familiar with how many of these
features can look very attractive in text-mode consoles. There
is nothing in the widget libraries that you could not do
yourself with just curses, but some other programmers have
put some thought into how to wrap up high-level interfaces.
See the Resources section for links to the modules mentioned.
In this article, we'll be limiting ourselves to the features of
curses itself. Since the curses module is part of the
standard distribution, you can expect it to be available
without requiring users to download support libraries or other
Python modules (at least on *nix systems). Also, it is useful
to have an understanding of the base support provided by
curses even as a building-block for use of modules built on
top of it. Even with curses alone, it is quite easy to build
attractive and useful text-mode applications in Python. One
footnote to notice is that pre-release notes suggest that
Python 2.0 will include an enhanced version of curses, but
this should be backward-compatible in any case.
As a test application for this article, the author will discuss
a wrapper he has written for the Txt2Html program introduced
in "Charming Python #3", whose techniques were discussed
further in subsequent columns. Txt2Html works in several
ways, but for purposes of this article, we are interested in
Txt2Html as a command-line format conversion program. One
way to operate Txt2Html is to feed it a bunch of command-line
arguments indicating various aspects of the conversion to be
performed, and let the application run as a batch process. For
occassional usage, it might be friendlier for users to be
presented with an interactive selection screen that leads users
through conversion options, and provides visual feedback of
options selected, before performing the actual conversion.
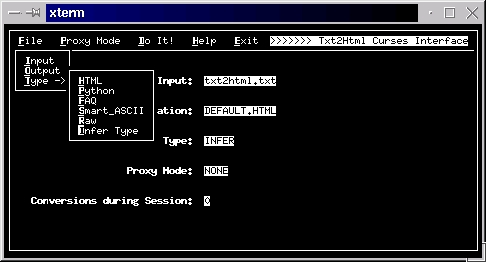
The application curses_txt2html is structured in terms of
a familiar topbar menu with drop-downs and nested submenus.
All of the menuing functions were done "from scratch" on top of
curses. As a result, these menus lack some of the features of
more sophisticated curses wrapper programs, but the basic
functionality can be implemented in a moderate number of lines
using only curses. In addition, a simple scrolling help box
is implemented, and several user-input fields. The below are
screenshots of the application that show the general layout and
style.
curses Application
The basic concept of curses programming is defining window
objects. A window is a region of the actual physical screen
that can perform positional input and output (using coordinates
relative to the window), can be moved around, and can be
created and deleted independently of other windows. Within a
window object, the cursor is the position at which input or
output actions take place; the cursor is usually set explicitly
by input and output methods, but it can also be modified
independently.
One consequence of initializing curses is that stream-oriented
console input and output is modified or disabled in various
ways. This is basically the whole point of using curses;
but one effect of disabling streaming console interaction is
that Python traceback events are not displayed in a normal
manner in the case of program errors. Andrew Kuchling
provided a good top-level framework for setting up curses
programs in his tutorial (see Resources). Using this template
(basically the same as Kuchling's) allows you to maintain the
error-reporting capabilities of normal command-line Python:
import curses, traceback
if __name__=='__main__':
  try:
      # Initialize curses
      stdscr=curses.initscr()
      # Turn off echoing of keys, and enter cbreak mode,
      # where no buffering is performed on keyboard input
      curses.noecho()
      curses.cbreak()

      # In keypad mode, escape sequences for special keys
      # (like the cursor keys) will be interpreted and
      # a special value like curses.KEY_LEFT will be returned
      stdscr.keypad(1)
      main(stdscr)                    # Enter the main loop
      # Set everything back to normal
      stdscr.keypad(0)
      curses.echo()
      curses.nocbreak()
      curses.endwin()                 # Terminate curses
  except:
      # In event of error, restore terminal to sane state.
      stdscr.keypad(0)
      curses.echo()
      curses.nocbreak()
      curses.endwin()
      traceback.print_exc()           # Print the exception
Within the try block we perform a few initialization calls,
then call the main() function to perform the actual
application functionality, then finally perform a bit of final
cleanup. Just in case something went wrong in the above steps,
the except block restores the console to its default state,
and reports the exceptions encountered.
Let us take a look now at what our specific curses_txt2html
application does by looking at its main() function.
def main(stdscr):
    # Frame the interface area at fixed VT100 size
    global screen
    screen = stdscr.subwin(23, 79, 0, 0)
    screen.box()
    screen.hline(2, 1, curses.ACS_HLINE, 77)
    screen.refresh()

    # Define the topbar menus
    file_menu = ("File", "file_func()")
    proxy_menu = ("Proxy Mode", "proxy_func()")
    doit_menu = ("Do It!", "doit_func()")
    help_menu = ("Help", "help_func()")
    exit_menu = ("Exit", "EXIT")
    # Add the topbar menus to screen object
    topbar_menu((file_menu, proxy_menu, doit_menu,
                 help_menu, exit_menu))

    # Enter the topbar menu loop
    while topbar_key_handler():
        draw_dict()
Our main() function does a few things. It is easy to think
of this function in terms of the three sections seperated by
blank lines.
The first section performs some general setup of our application's appearance. In order to establish some predictable spacing relations between application elements, we decided to limit our interactive area to an 80x25 VT100/PC screen size (even if an actual terminal window is larger). We draw a visual box around this sub-window, and use a horizontal line for visual offset of the topbar menus.
The second section establishes the particular menus used by our
applications. The function topbar_menu() performs a little
bit of magic in binding hotkeys to application actions, and
displaying menus with the desired visual attributes. Check out
the source archive provided for the full code to this.
topbar_menu() should be pretty generic to whatever menus you
might want to use, and you are welcome to incorporate it into
your own applications. The main thing to know is just that
once the hotkeys are bound, they eval() whatever string is
contained in the second element of the tuple associated with a
menu. For example, activating the "File" menu in the above
setup will wind up calling eval("file_func()"). Therefore,
the application is required to define a function called
file_func(), and this function is also required to return a
boolean value indicating whether an application end-state has
been reached.
The third section--with just two lines--is where the whole
application actually runs. The function topbar_key_handler()
does pretty much what its name suggests. It waits for
keystrokes, then handles them. The key handler might return a
boolean false value, and if it does that ends the application.
In our application, the key handler consists of a check for the
keys that were bound by the second section; but even if your
curses application does not bind keys in the same manner, you
will still want to use an event loop similar to the above. The
key thing is that your handler will probably use a line like,
c = screen.getch() # read a keypress
within its key hander. Our draw_dict() function is the only
thing directly within the event loop. In our case, this
function draws some values in a few locations in the screen
window; but in any application you will probably want to
include a line like,
screen.refresh() # redraw the screen w/ any new output
inside your drawing/refresh function (or just inside the event loop itself).
Probably the main thing a curses application needs to do is
get input (keypress) events from the user. That is how the
application is used, after all. We have already seen the
.getch() method, so let us look at an example that combines
.getch() with the other input method .getstr(). Below is
an abbreviated version of the file_func() function we have
mentioned (it is activated by the "File" menu):
def file_func():
  s = curses.newwin(5,10,2,1)
  s.box()
  s.addstr(1,2, "I", hotkey_attr)
  s.addstr(1,3, "nput", menu_attr)
  s.addstr(2,2, "O", hotkey_attr)
  s.addstr(2,3, "utput", menu_attr)
  s.addstr(3,2, "T", hotkey_attr)
  s.addstr(3,3, "ype", menu_attr)
  s.addstr(1,2, "", hotkey_attr)
  s.refresh()
  c = s.getch()
  if c in (ord('I'), ord('i'), curses.KEY_ENTER, 10):
      curses.echo()
      s.erase()
      screen.addstr(5,33, " "*43, curses.A_UNDERLINE)
      cfg_dict['source'] = screen.getstr(5,33)
      curses.noecho()
  else:
      curses.beep()
      s.erase()
  return CONTINUE
This function combines several curses features. The first
thing it does is create another window object. This new
window object is the actual drop-down menu for the "File"
topbar menu. Therefore, we also decide to draw a frame around
the window with the .box() method. Within the window s we
draw several menu options corresponding to the options in the
drop-down menu. A slightly laborious method is used because
we want to have the hotkey for each option highlighted to
contrast with the rest of the option description (take a look
at topbar_menu() in the full source for a somewhat more
automated handling of the highlights. The final .addstr()
call is used to place the cursor on top of the default menu
action. As with the main screen, we call s.refresh() to
actually display the elements we have drawn to the window
object.
Once we have drawn our drop-down menu, we want to read in a
users selection. This is done with the simple s.getch()
call. In our demonstration application, menus only respond to
hotkeys, not to arrow-key selection and movable highlight bars.
These more sophisticated menuing functions could be built by
capturing additional key actions, and setting up event loops
within drop-down menus. But the example suffices to get the
idea.
Next we need to compare the read in keystroke against various
hotkey values. In the above case, a drop-down menu option can
be activated by an upper or lower case version of its hotkey,
and the default option can be activated with the ENTER key.
The curses special key constants do not seem to be entirely
reliable, and this author found that adding the actual ASCII
value "10" was necessary to trap the ENTER key. Notice that if
you wish to perform a comparison to a character value, you want
to wrap the character's string in the ord() built-in Python
function.
Assuming the "Input" option is selected, we get to the use of
the .getstr() method. This method provides field entry with
crude entry editing capability (you can use the backspace key).
Entry is terminated by the ENTER key. Whatever value is
entered is returned by the method, and will generally be
assigned to a variable, as in the above example. A little
trick the author used to help visually distinguish the entry
field was to pre-underline the area where the field entry would
occur. Doing this is not necessary by any means, but it adds a
little visual flair. The underline is performed by the line:
screen.addstr(5,33, " "*43, curses.A_UNDERLINE)
Of course, you will also want to remove the field entry
emphasis, which happens to be done within the draw_dict()
refresh function in our application, with the line:
screen.addstr(5,33, " "*43, curses.A_NORMAL)
The techniques outlined here--and especially those additional
ones used in the full application source code should get you
started with curses programming. Play with it a bit, it is
not hard to work with. One nice thing is that the curses
library may be accessed by many languages other than Python
also, so what you learn using Python's curses module is
mostly transferrable elsewhere.
If the base curses module starts to have more limitations
than you wish, the Resources section provides links to a number
of modules that add on to the capabilities of curses, and
provide a nice gentle path for growth.
Andrew Kuchling has written a nice introductory tutorial on
curses programming, titled Curses Programming With Python.
Parts of this article are inpired by Kuchling's examples,
although this article covers somewhat different (mostly higher
level) elements of curses programming:
http://www.python.org/doc/howto/curses/curses.html
The best general starting place for information on text-based UI tool in Python is:
http://www.vex.net/parnassus/apyllo.py?i=243256747
Python ncurses is an enhanced module to support a larger
range of ncurses functionality than Python 1.5.2 curses
does. Preliminary plans are to have ncurses replace curses
in Python 2.0. ncurses can be found at:
http://pyncurses.sourceforge.net/
Tinter is a module of high-level widgets built on top of
curses. Tinter supports buttons, text boxes, dialog boxes,
progress bars, etc:
http://office.iximd.com/~dwalker/
An under-publicized--and somewhat hard to track
down--alternative to ncurses and various wrappers is the
combination of slang and newt with the python wrapper
module snack. slang does roughly what curses does, and
newt does roughly what Tinter does. One place to find
these modules, and supporting libraries is:
http://www.at.debian.org/Packages/frozen/interpreters/python-newt.html
For some examples of snack, take a look at:
http://debian.acm.ndsu.nodak.edu/doc/python-newt/
pcrt is a module for direct ANSI escape-code screen access.
This allows writing to specific locations on screen, and with
specific colors and attributes. It is a low-level interace
(even more so than curses) and will only work on consoles
that support ANSI escape-codes (which is most of them). But
it is a nice way to add some splash to your text-mode
applications:
http://www.cyncore.com/
dialog is a Python wrapper around the Linux dialog
utility. The utility (and its Python wrapper) lets you create
yes/no, menu, input, message, text, info checklist and
radiolist dialogs. It is really possible to do a lot very
quickly using this utility and module, if the platform
restriction is not a problem (the target Linux distribution
will need to have dialog, of course):
http://pc-ginsberg.darmstadt.gmd.de/robb
Files used and mentioned in this article:
http://gnosis.cx/download/charming_python_7.zip
David Mertz believes that God gave use the keyboard and the TTY
while all other interface devices are mere human artifice.
David may be reached at [email protected]; his life pored over at
http://gnosis.cx/publish/. Suggestions and recommendations on
this, past, or future, columns are welcomed.